Using an agent in Agent flows in Microsoft Copilot Studio
Once the agent that uses XTM MCP Server has been created (for details, see Configuring agent in Copilot Studio), you can use the agent in Agent flows in Microsoft Copilot Studio. For example, you can create an automation that checks every morning, at 8 a.m. your local time, if there are any projects that require immediate attention and, if so, posts a list of these projects in a selected Microsoft Teams channel. This example is described in the procedure below. For more information about agent flows, see Agent flows overview in Microsoft Copilot Studio documentation.
Prerequisites:
Permission to create and publish agent flows.
A configured and published Agent.
A working connection between the agent and the XTM MCP server.
Warning
The procedure below refers to third-party systems, whose user interface may be subject to change.
If the procedure below differs from the current user interfaces of Microsoft tools, refer to the official Microsoft documentation.
For Microsoft Copilot Studio, see https://learn.microsoft.com/en-us/microsoft-copilot-studio/.
For Microsoft Teams, see https://learn.microsoft.com/en-us/microsoftteams/.
Create the agent flow.
To do so, follow these steps:
Open Microsoft Copilot Studio.
Select Workflows from the left-hand side navigation menu.
In the top right-hand corner of the Workflows screen, select the chevron down icon
 to the right of the New workflow button.
Result: a popup containing two workflow types is displayed.
In the popup, select Agent flows in the Build using standard orchestration section.
Note
The Workflow option uses the GitHub Copilot harness.
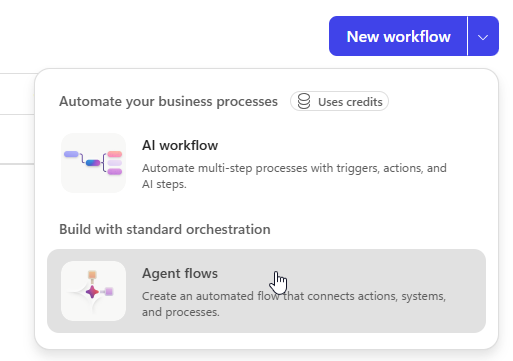
Selecting Agent flows
Result: the Agent flows > Designer tab screen is displayed. You will perform the next step in this screen.
Add a scheduled trigger
To do so, follow these steps:
In the Designer tab screen, select Add a trigger.
In the search box, type Schedule. From the results list, select Recurrence.
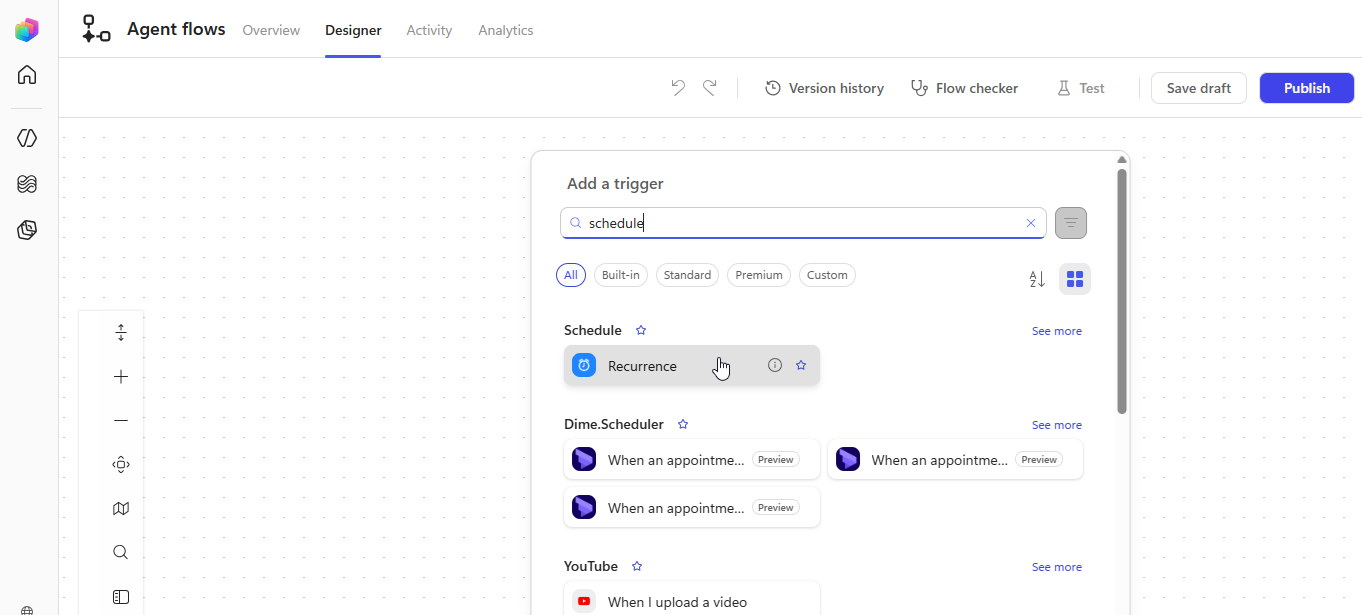
Selecting the Recurrence option
Configure the daily schedule
To do so, configure the Recurrence trigger using the following values:
Table 6. Recurrence trigger configurationField
Value to enter or select
Interval
1
Frequency
Day
Time zone
Select the required time zone
Example: (UTC+01:00) Sarajevo, Skopje, Warsaw, Zagreb
Start time
Leave empty unless a specific first-run date is required
At these hours
Select the required hour
Example: 8
At these minutes
Select the required minutes
0
Result: the Preview field displays the scheduled runtime. In our example it is:
Runs at 8:00 every day.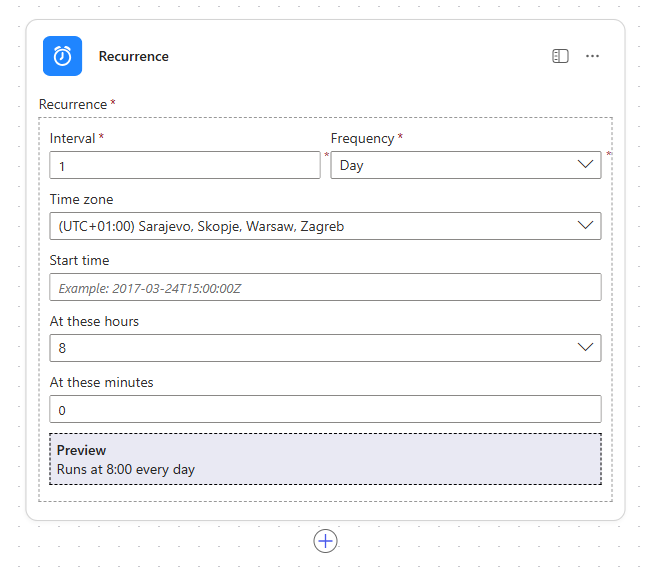
Recurrence trigger configuration
Add the agent that uses the XTM MCP Server.
To do so, follow these steps:
Select the plus icon
 after the Recurrence trigger.
Result: the Add an action section is displayed.
Use the search box in the Add an action section to find and select the Run an agent option.
Result: the Run an agent section is displayed.
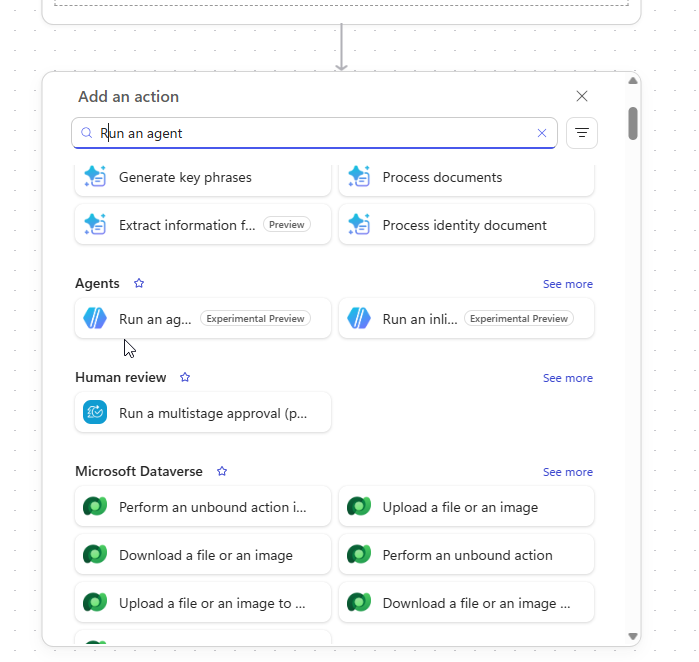
Selecting the Run an agent option
Configure the agent that uses the XTM MCP Server.
To do so, in the Run an agent section, follow these steps:
In the Agent field, from the dropdown, select your required agent.
Disable the Request human assistance when unsure setting. This is an unattended scheduled process and should not wait for an emailed response.
In the Message field, configure the risk analysis message (prompt) for your selected agent.
To do so, copy and enter this prompt in the Message field:
Important
The agent flow is read-only from the XTM Cloud perspective. Its instructions explicitly prohibit changing XTM Cloud data.
You produce a daily XTM project-attention report for Microsoft Teams.
Goal
- Read live XTM MCP data only.
- Never change XTM data.
- Never invent projects, flags, counts, dates, or reasons.
Allowed tools
- search_projects
- flag_projects_needing_attention
Forbidden tools
- assign_user
- unassign_user
- any other tool
If a required tool fails, do not guess. Return a valid Adaptive Card that states
the failure in one sentence, set has_risk to false, and stop.
Step 1 — find candidates
Call search_projects once with:
- activity: ["ACTIVE"]
- page: 1
- page_size: 100
Do not pass status, name, dates, or other filters.
Passing activity is required: without a real filter, search_projects only
returns projects created in the last 14 days.
Do not pass status: that filter accepts only one value per call.
From the response, build the candidate list:
1. Keep unique projects by id.
2. Drop projects whose status is FINISHED.
3. Sort remaining projects by dueDate ascending. dueDate is epoch milliseconds.
   Projects with null dueDate go last.
4. Take at most 20 projects, in that sorted order.
If none remain, skip Step 2. Set has_risk to false and return a valid card whose
only message is: "No active projects were available to check."
Record:
- checked_count = number of project IDs you will send in Step 2
- search_page_count = pageItemsCount
- search_total_count = totalItemsCount
Step 2 — flag problems
Call flag_projects_needing_attention once with those project IDs.
Do not send more than 20 IDs.
Do not call it with an empty list.
has_risk is true only when needsAttention is not empty. Otherwise false.
Keep the needsAttention order. Do not re-sort.
Step 3 — Adaptive Card
Return one Adaptive Card, version 1.5, as valid JSON in adaptive_card_json.
No Markdown, no code fences, no text outside that JSON.
Card rules
- "$schema": "http://adaptivecards.io/schemas/adaptive-card.json"
- "type": "AdaptiveCard"
- "version": "1.5"
- Heading: "XTM projects at risk"
- Show checked_count and the report time from asOf (ISO 8601 UTC). If Step 2
  was skipped, omit asOf.
- If search_total_count is greater than pageItemsCount, add a short warning that
  this is the first page only, then the 20 soonest dueDate values from that page,
  not the full portfolio.
- If omitted is not empty, add a short warning listing each omitted projectId and
  reason. Do not treat omitted projects as safe.
- One Container per needsAttention project, in the returned order, containing:
  - name
  - projectId
  - one concise reason built only from that project's flags and numbers
Reason rules — use only returned fields; join multiple flags with "; "
- OVERDUE: "Overdue" plus daysUntilDue when not null (negative means overdue)
  and overdueStepCount when greater than 0
- DUE_WITHIN_24_HOURS: "Due within 24 hours"
- UNASSIGNED_WORK: "Unassigned active work" plus unassignedActiveStepCount when
  not null
- ASSIGNMENTS_UNKNOWN: "Assignment data unavailable — unassigned work could not
  be verified"
- remainingWwcPercent: include only as extra context, never as the sole reason
- Never say a project is unassigned when the only flag is ASSIGNMENTS_UNKNOWN
- Never mention a flag that was not returned
If needsAttention is empty and Step 2 succeeded, the card body is:
- heading
- checked_count
- asOf
- any sample/omitted warnings
- the sentence: "No projects at risk were detected."
Do not add actions, URLs, scores, rankings, or advice.
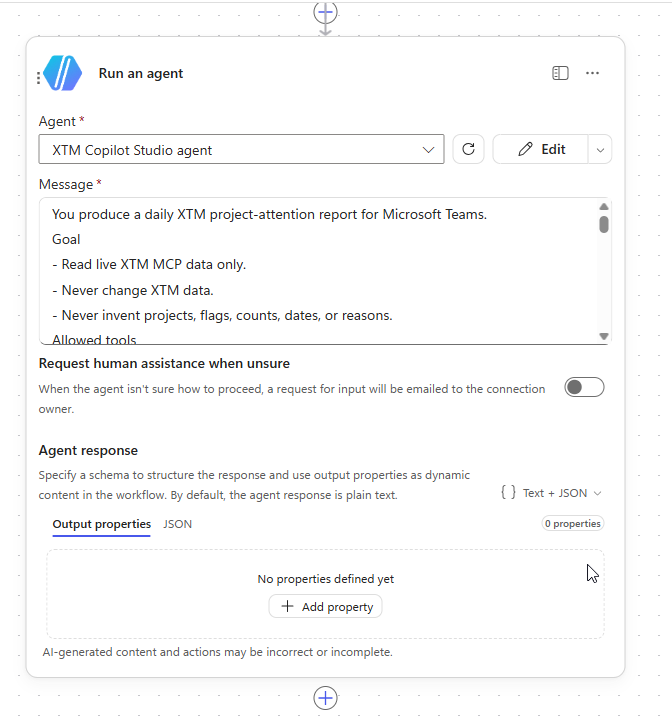
Configuring Agent, Message, and Request human assistance when unsure settings
Important
The visible Message field does not display the entire prompt content. Ensure that you entered the entire prompt content while configuring your agent flow.
In the Agent response section, from the dropdown on the right-hand side, select Text + JSON. Then, add the following output properties:
Table 7. Structured Response configurationDisplay name
Property name
Type
Required?
Has Risk
has_risk
Boolean
Yes, activate the Required toggle switch
Adaptive Card Json
adaptive_card_json
String
Yes, activate the Required toggle switch
Important
These outputs are required so that the next agent flow steps can use the agent result as dynamic content.
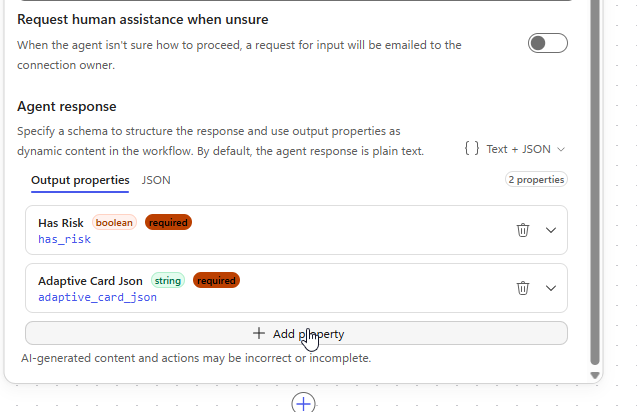
Configuring Agent response settings
Add the risk condition
To do so, follow these steps:
Select the plus icon
after the Run an agent section.Result: the Add an action section is displayed.
Use the search box in the Add an action section to find and select the Condition option.
Result: the Condition section is displayed. It creates two branches automatically:
True: you will configure it to send the risk notification. This is described at a later stage in this procedure. For details, see Configuring the True branch step below.
False: this branch will not perform any action.
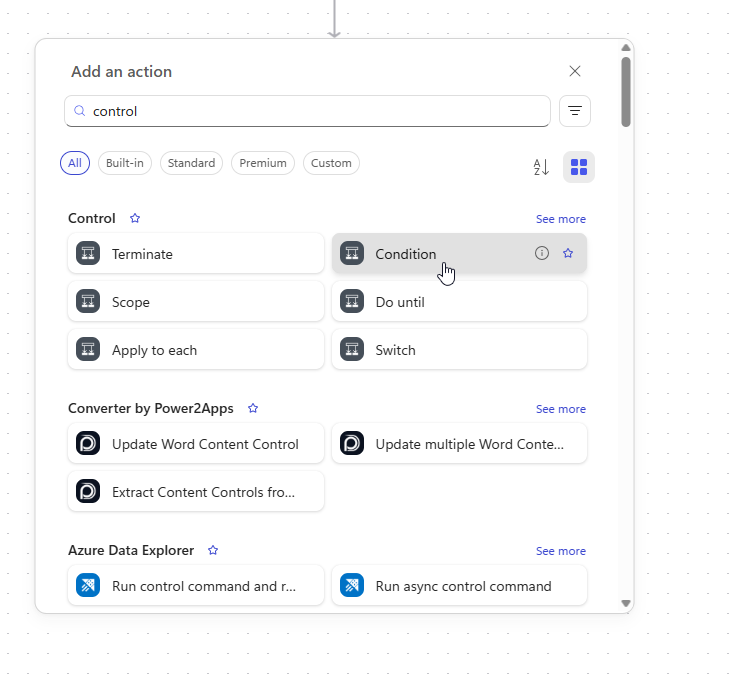
Selecting the Condition option
Configure the Condition
To do so, for the left-hand side field, enter
/, then select the Insert dynamic content option. Next, select Has Risk for the left-hand side field. Finally, select is equal to as an operator and the true for the right-hand side value.Table 8. Adding Risk ConditionLeft value
Operator
Right value
Has Risk from the Run an agent agentic flow step
is equal to
true
Important
Do not enter an internal path such as
body/structuredContent/...manually.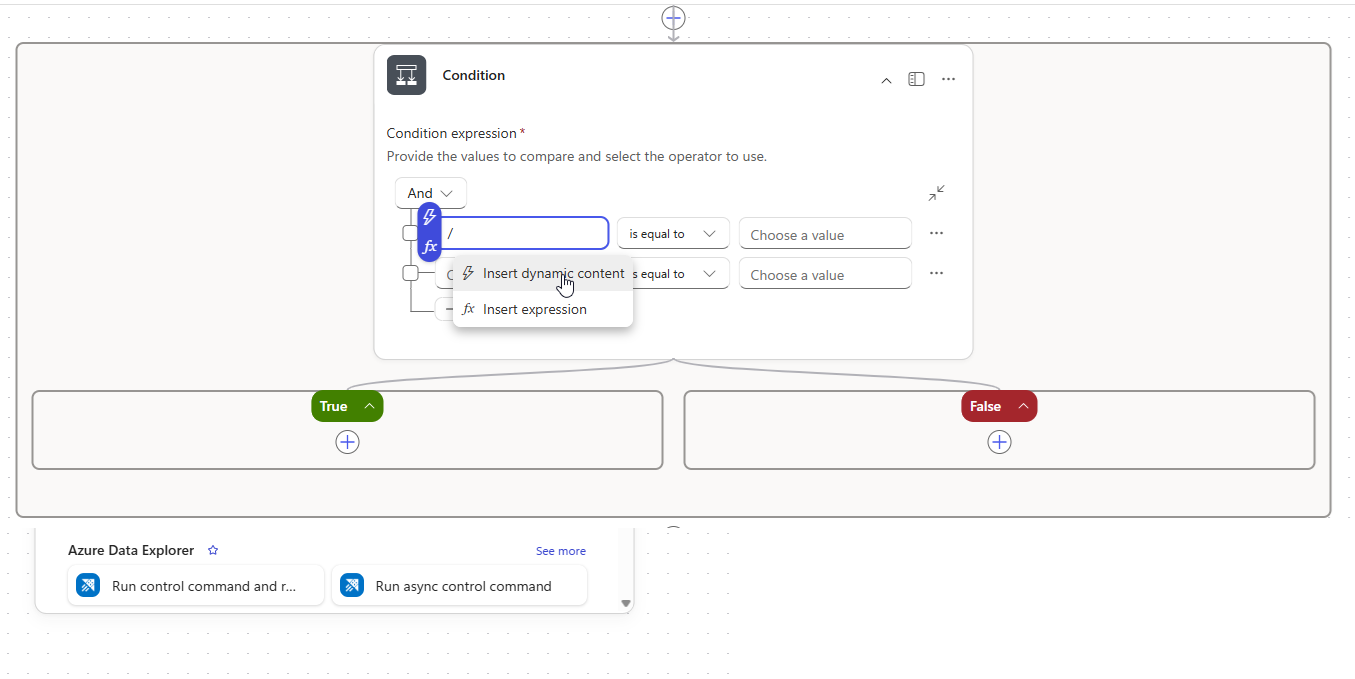
Selecting Insert dynamic content for the Condition
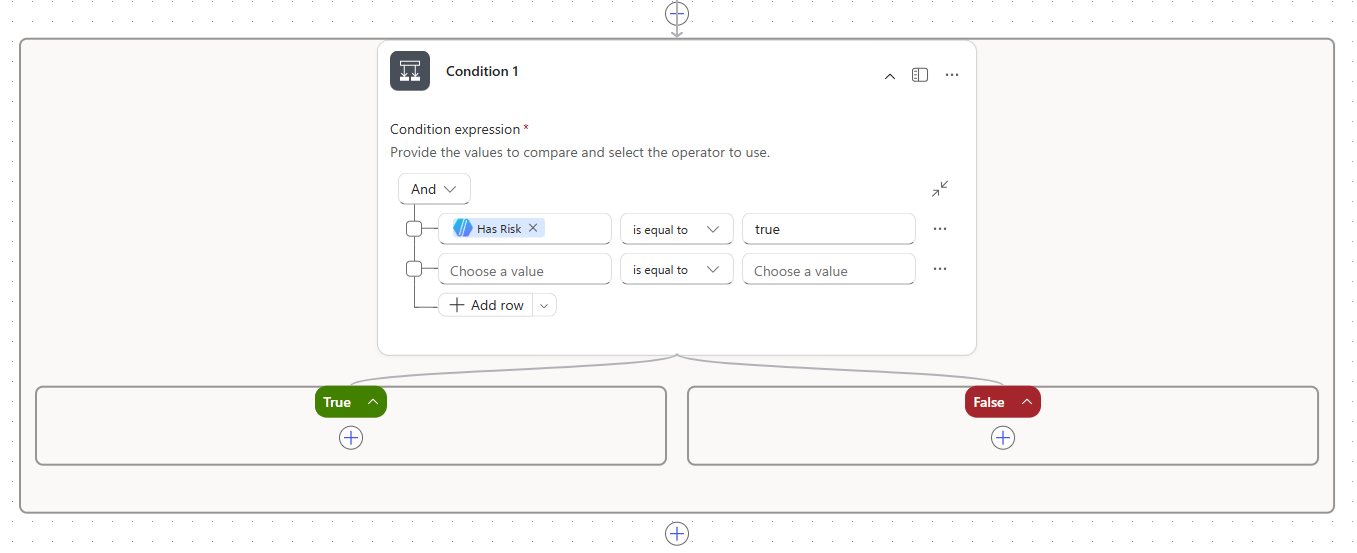
Configuring Condition for the agent flow
Configure the True and False branches
In the True branch, add the Teams Notification:
To do so, follow these steps:
Select the plus icon
after the True label.Result: the Add an action section is displayed.
Use the search box in the Add an action section to find and select the Post card in a chat or channel option in the Microsoft Teams section.
Result: the Post card in a chat or channel section is displayed.
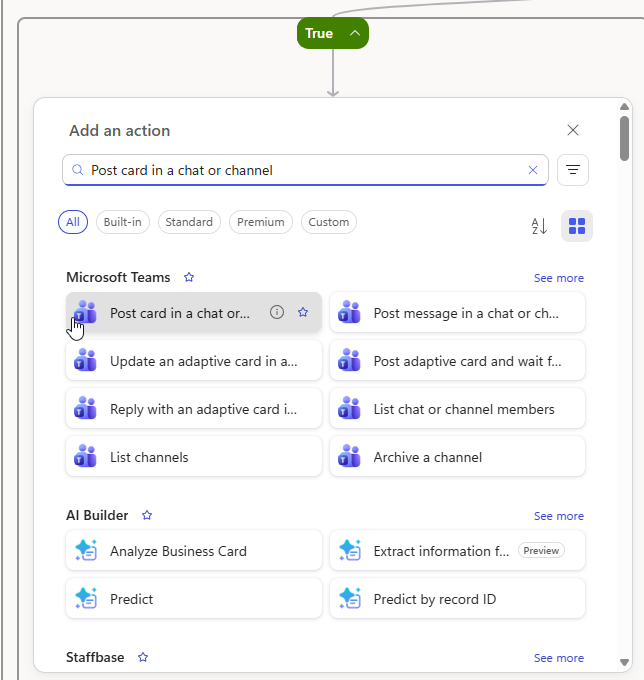
Selecting the Post card in a chat or channel option
If required, in the Post card in a chat or channel section, sign in to Microsoft Teams.
Configure the action in the Post card in a chat or channel section by selecting these field values:
Table 9. Adding Teams NotificationField
Value
Post as
Flow bot
Post in
Channel
When you select this value, the Team, Channel, and Adaptive Card settings are displayed
Team
Select your required target team
Example: Test
Channel
Select your required target notification channel
Example: test
Adaptive Card
Enter
/, then select the Insert dynamic content option. Finally, select Adaptive Card JSON from the Run an agent output.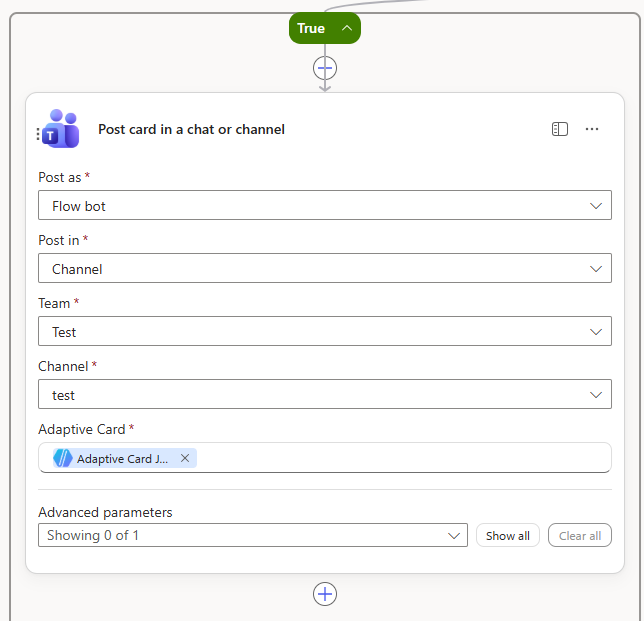
Configuring the True branch
Leave the False branch empty. This way, when no project risk is found, the flow completes without sending a notification.
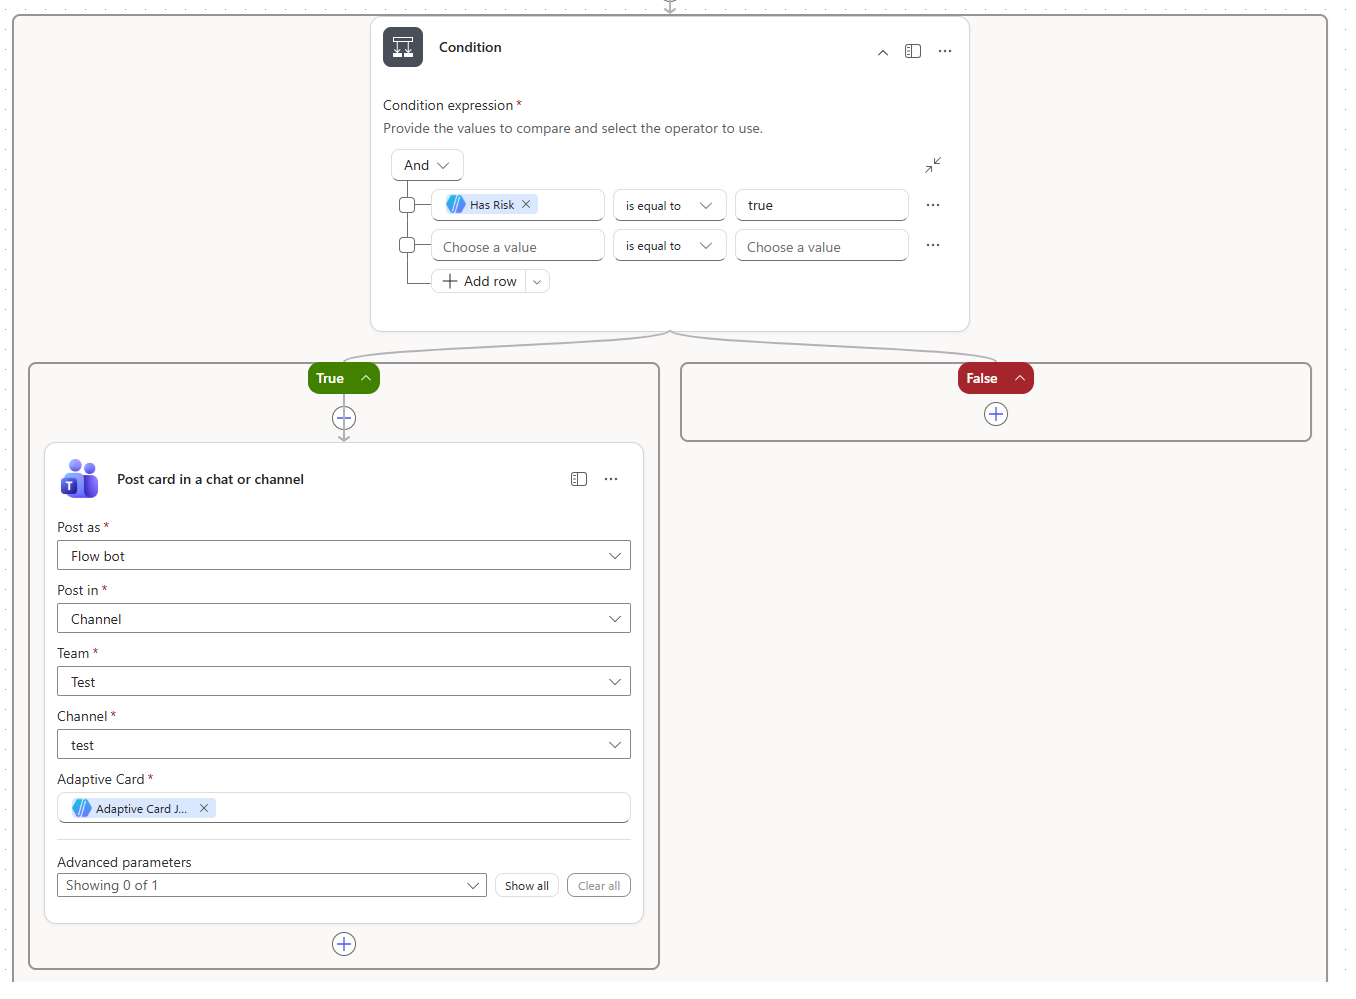
Complete Condition, True, and False configuration
Review the agent flow
Ensure that your agent flow has this structure:
Recurrence: every day at 8:00
            │
            ▼
        Run Agent
            │
            ▼
Is Has Risk equal to true?
       ┌────┴────┐
       │         │
     True       False
       │         │
       ▼         └── No action
Post Adaptive Card
to Teams
Check the flow for errors
To do so, follow these steps:
Select the Flow checker button in the top navigation bar.
Result: the Flow checker pane is displayed. In it:
Review all errors and warnings.
Correct any missing connections or required values.
After you have corrected all listed errors, close the Flow checker pane.
In the Condition section of your agent flow, remove the unused condition row if it is still present.
When you have removed all errors, select the Save draft button in the top navigation bar.
You can now set the flow name, for example, to:
Project at Risk Notification
Test the Flow
To do so, follow these steps:
Select the Test button in the top navigation bar.
Result: the Test Flow pane is displayed. In it:
Start a test run.
Monitor the execution of each step.
Ensure that the Run an agent step completes successfully.
Review the structured response and verify it :
the
has_riskparameter is eithertrueorfalse.the
adaptive_card_jsonparameter contains valid card JSON when thehas_riskparameter istrue.
If the
has_riskparameter istrue, ensure that the Post card in a chat or channel action runs succesfully in Teams.
Open the target Microsoft Teams channel and ensure that the Adaptive Card was posted.
If the
has_riskparameter is false, ensure that the flow completes without posting a card.Important
Testing the flow can create an actual Teams notification. Therefore, if possible, use a dedicated test channel.
Publish the Flow
To do so, follow these steps:
Select the Flow checker button in the top navigation bar again.
Result: the Test Flow pane is displayed.
In the Test Flow pane, select the Publish button at the bottom of the pane.
Wait for the publication to complete.
Select the Overview tab from the top navigation bar. In the Overview tab screen, ensure that the flow is enabled.
After the first run, select the Activity tab from the top navigation bar. In the Activity tab screen, check if the scheduled execution completed successfully.
Important
After publication, the flow runs automatically every day at the configured time.
Monitor the Flow
To do so, use the Activity tab screen to review:
Run time.
Run status.
Agent execution.
Structured agent output.
Condition result.
Teams notification status.
Authentication or connector errors.
Expected statuses include:
Succeeded– all applicable agent flow steps have been completed.Failed– one or more agent flow steps returned an error.Running– the agent flow execution is still in progress.Canceled– the agent flow execution was stopped.